What Is Black Mold & What Homeowners Should Look For

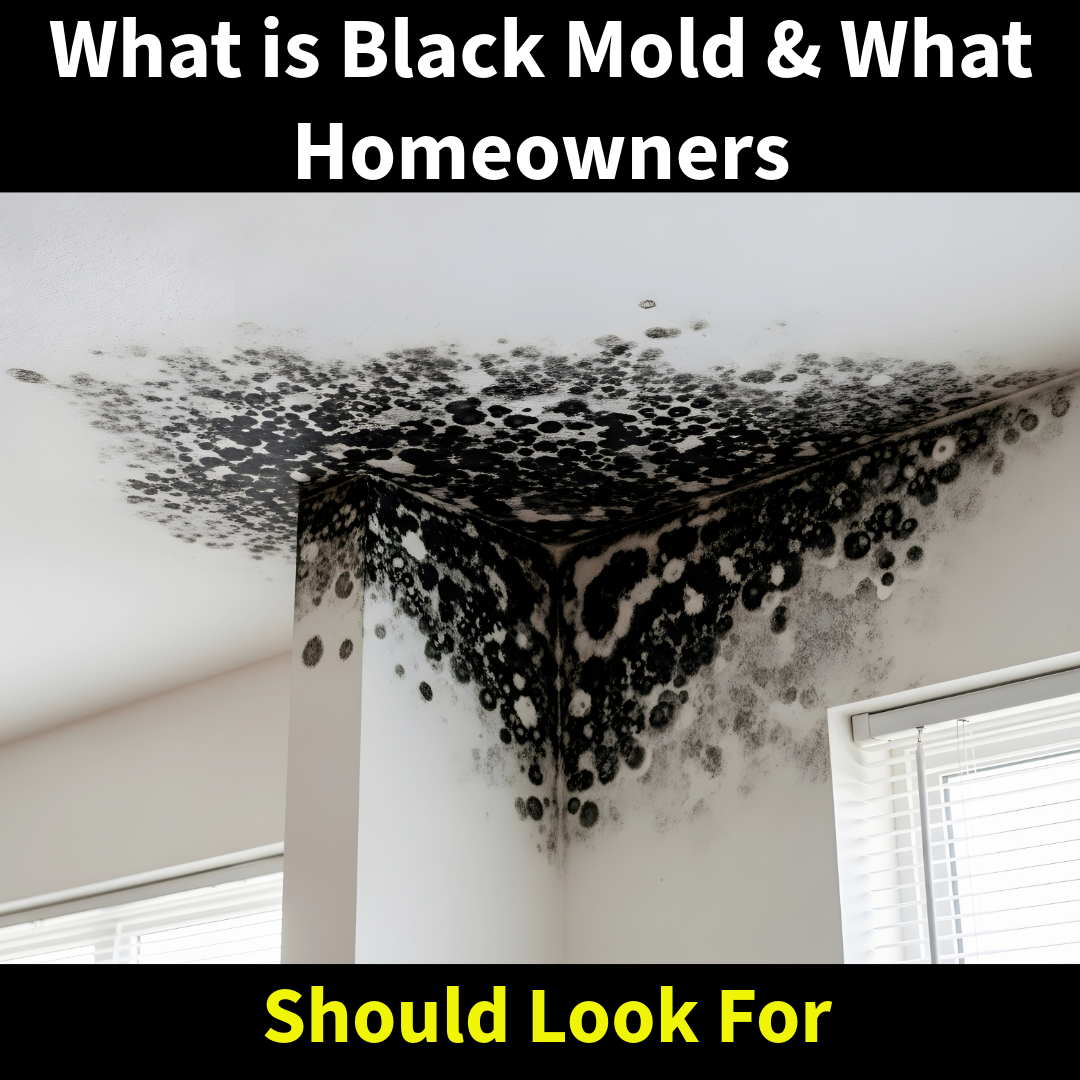
Black mold is one of the most searched and misunderstood issues homeowners face. Many people use the term to describe any dark mold growth they see in a basement, bathroom, or near a leak. But what is black mold really, and what should you actually be looking for? Understanding how mold develops, and how different types of homes handle moisture is far more important than focusing on color alone.


Most homeowners are referring to Stachybotrys chartarum, a species that can appear dark green or black and typically grows on materials that have remained wet for an extended period. However, many molds appear dark in color. The only way to determine the species is through proper laboratory testing. Color alone does not determine severity or risk.

What matters most is:

  • The moisture source
  • How long materials have been wet
  • The extent of growth
  • Whether conditions are still supporting mold development

Different home styles create different moisture risks. In older row homes, like those commonly found in Philadelphia and other urban areas, shared walls and aging plumbing systems can allow slow leaks to go unnoticed. Flat roofs and limited ventilation can also trap moisture. In suburban homes throughout areas like Delaware and Chester County, or similar developments nationwide, finished basements and modern insulation systems can trap moisture inside wall cavities after even minor plumbing leaks.

Across the country, the same patterns appear:

  • Slab construction allows water to travel beneath flooring
  • Finished basements conceal leaks behind drywall
  • Poor attic ventilation leads to condensation
  • Ice dams force water behind siding
  • Appliance line failures saturate structural materials

The structure of the home often determines how moisture behaves.


Mold needs three things:

  1. Moisture
  2. Organic material such as drywall, wood, or insulation
  3. Time

Common causes include:

  • Plumbing leaks behind walls
  • Refrigerator or dishwasher line failures
  • Roof leaks
  • Ice dam intrusion
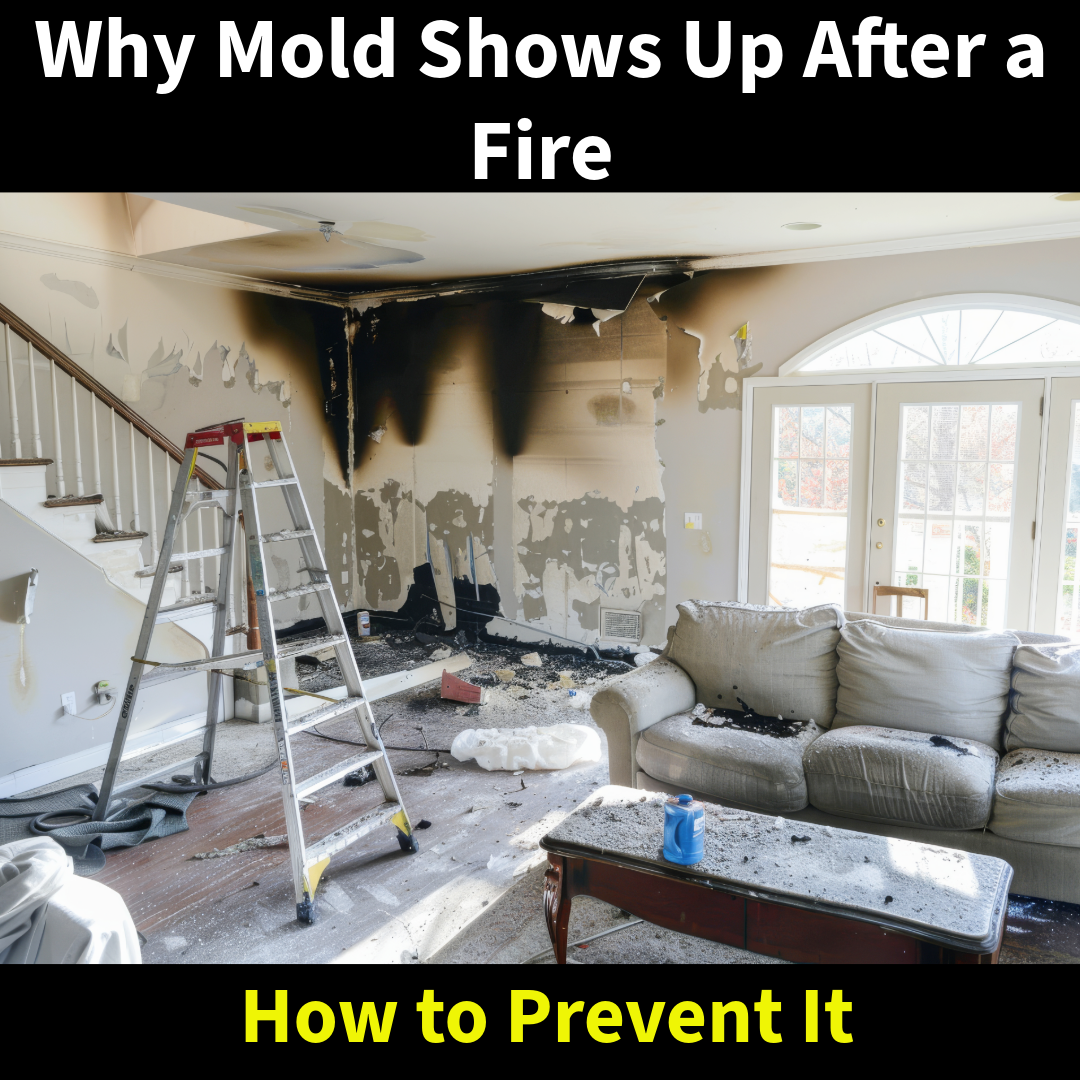
  • Flooding or sewer backups
  • Improper drying after water damage

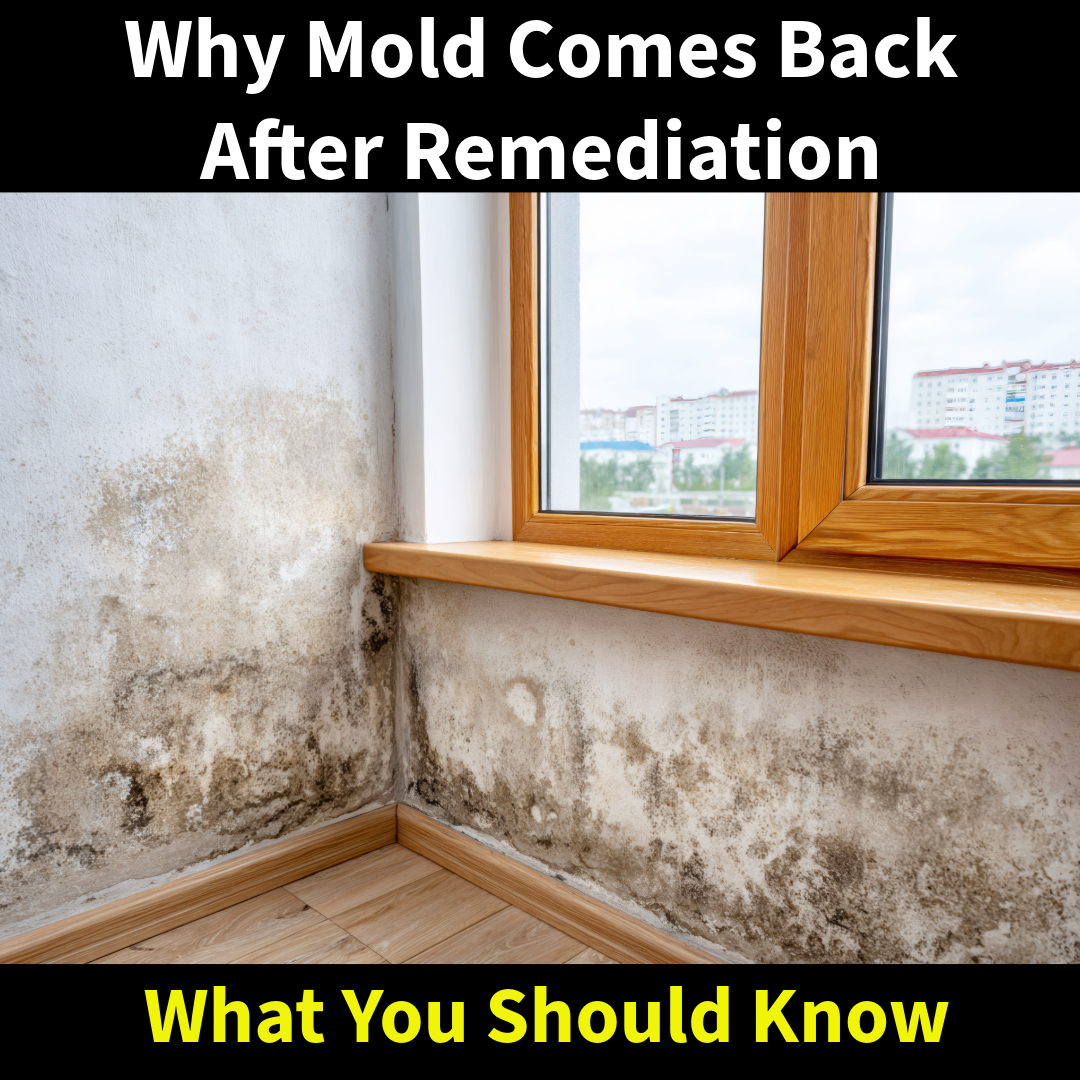
In many situations, mold develops not because of a dramatic flood, but because moisture was never fully dried inside walls, ceilings, or under flooring.


Instead of focusing only on visible black staining, watch for:

  • A persistent musty odor
  • Peeling or bubbling paint
  • Warped baseboards
  • Soft drywall
  • Stains that continue to expand
  • Areas that remain damp
  • Previous water damage that was “quickly dried”

Mold often grows behind surfaces long before it becomes visible.


Homeowners sometimes report irritation, allergy-like symptoms, headaches, or increased respiratory sensitivity when mold is present. Reactions vary depending on individual sensitivity and the amount of mold present. Regardless of symptoms, indoor mold growth should be properly evaluated and addressed. The focus should always be identifying and correcting the moisture source.


Many molds appear dark in color. Some lighter molds can also exist in high concentrations.

The real concern is:

  • The amount of mold present
  • Whether it is actively growing
  • Whether moisture conditions remain
  • Whether building materials are compromised

Visual inspection alone does not determine this.


Do not:

  • Spray bleach on porous materials
  • Scrape or disturb the area
  • Paint over staining
  • Ignore musty odors

Disturbing mold without containment can spread spores further.

Instead:

  • Look for potential moisture sources
  • Avoid disturbing the area
  • Schedule a professional inspection if growth is suspected

Black mold is not about color. It is about moisture and building conditions. Whether you live in a row home, a finished basement colonial, a slab-built ranch, or a townhouse, the conditions that allow mold to grow are remarkably similar. Understanding how moisture behaves in your type of home is the key to preventing long-term problems.

Frozen Fire Sprinkler Line Causes Multi-Level Water Damage in Berwyn

Recently, we responded to a significant water loss in Berwyn after a residential fire sprinkler line cracked during freezing temperatures. The sprinkler line had been installed inside a joist pocket adjacent to the garage. Because the space was not properly insulated, cold air exposure allowed the line to freeze. When temperatures rose and the pipe thawed, it split and released water throughout the home.

The water affected multiple areas, including the dining room, kitchen, garage, and finished basement. By the time the leak was discovered, moisture had already migrated through ceiling cavities and wall assemblies. Our initial focus was stabilization. Water extraction was performed, affected materials were evaluated, and drying equipment was strategically placed to prevent secondary damage. Moisture readings were monitored to ensure structural components returned to acceptable levels before repairs began.

We also assisted the homeowner in documenting the loss and navigating the insurance claim process. Proper documentation, photographs, and moisture mapping are essential when filing a claim for a multi-area water event like this.

Residential fire sprinkler systems are designed for life safety. However, they are still pressurized plumbing systems. Like any water line, they are vulnerable to freezing if exposed to unconditioned air.

While routine servicing would not necessarily have prevented this particular failure, periodic inspection of sprinkler systems is important. Homeowners should ensure that:

  • Sprinkler lines are not installed in uninsulated exterior cavities
  • Garage-adjacent piping is properly protected from cold exposure
  • Mechanical components are inspected according to manufacturer guidelines
  • Any signs of corrosion or damage are evaluated promptly

In colder months especially, concealed sprinkler piping in attic spaces, garage ceilings, and exterior wall cavities can present a risk if insulation is insufficient.

Water from a cracked sprinkler line often travels far beyond the visible leak. In this Berwyn home, moisture moved from the garage ceiling into adjacent living areas and eventually into the basement below. When water originates overhead, gravity allows it to travel vertically and laterally through framing systems, insulation, and subfloor assemblies. Without proper drying and monitoring, trapped moisture can lead to material deterioration and microbial growth.

Situations like this serve as a reminder that even systems designed for safety can create unexpected challenges if environmental conditions are not considered during installation. If you have questions about sprinkler line placement, freeze protection, or water damage mitigation, it is always better to address concerns early rather than after a failure occurs.

Why Mold Comes Back After Remediation

When mold returns after remediation, the first reaction is usually frustration. Many assume the removal was done incorrectly. While improper remediation can be a factor, recurring mold growth is often tied to unresolved moisture conditions.

Mold does not return without water.


The most common reason mold reappears is that the original moisture source was not permanently corrected. A frequent example is a roof leak. The interior damage may be addressed, drywall replaced, and visible mold removed — but if the roofing issue was only patched temporarily or improperly repaired, water intrusion will occur again. When moisture returns, mold growth follows.

The same applies to plumbing leaks, window flashing failures, and foundation seepage. If the source is not corrected at its origin, remediation alone will not prevent recurrence.


In some cases, materials appear dry on the surface but retain elevated moisture internally. Insulation, subfloors, and framing members can hold moisture longer than expected. If drying is incomplete or not verified with proper moisture mapping, microbial growth can redevelop. Dry to the touch does not mean dry within.


If proper containment procedures are not maintained during demolition or reconstruction, spores can spread to adjacent areas. When those spores settle in areas with ongoing humidity or minor moisture, new colonies can establish.

Remediation is not just removal — it is controlled removal.


Even after a successful remediation, poor humidity control can allow mold to reappear. Bathrooms, attics, basements, and improperly ventilated spaces are especially vulnerable. Mold requires moisture, and high indoor humidity can provide it.


When mold comes back, the question is not “Why did the mold return?” but “Where is the water?”

Proper remediation must be paired with:

  • Identification of the moisture origin
  • Verification that repairs were completed correctly
  • Moisture monitoring before rebuild
  • Ongoing environmental control

Without addressing the underlying moisture issue, recurrence is predictable.

Why Mold Shows Up After Fire Damage

When most homeowners think about fire damage, they picture burned framing, smoke stains, and heavy odor. What they don’t expect is mold. But mold growth after a fire is more common than many realize. In fact, it often develops weeks after the fire appears to be cleaned up. Here’s why.


Fires are extinguished with water. Sometimes thousands of gallons. That water soaks into:

  • Drywall
  • Insulation
  • Framing
  • Subfloors
  • Cabinets
  • Wall cavities
  • Ceiling assemblies

Even if the fire itself was contained to one room, the water used to extinguish it can travel well beyond the burn area. If materials are not dried quickly and properly, moisture remains trapped inside the structure. And that’s when mold begins to grow.


Fire damage isn’t just about heat and water. Smoke particles and soot residue create additional complications:

  • They penetrate porous materials
  • They leave acidic residues
  • They contaminate surfaces
  • They interfere with proper drying

When soot-covered materials remain damp, they create an ideal environment for microbial growth. So now you don’t just have fire damage — you have a moisture problem inside contaminated building materials.


Mold does not need months to grow. Under the right conditions, mold can begin developing in as little as 24–48 hours after materials become wet. After a fire, homeowners are often focused on:

  • Insurance claims
  • Temporary housing
  • Structural repairs
  • Smoke odor removal

Meanwhile, hidden moisture sits inside walls, ceilings, and flooring systems. By the time reconstruction begins, mold may already be active behind finished surfaces.


A common mistake after fire damage is focusing only on soot cleanup and odor control. Cleaning visible surfaces does not address moisture trapped behind walls or inside insulation. Proper post-fire restoration should include:

  • Moisture mapping
  • Thermal imaging
  • Controlled demolition where necessary
  • Structural drying
  • Monitoring of moisture levels

Without proper drying protocols, microbial growth becomes a secondary loss.


If mold develops after a fire, it complicates everything:

  • Additional remediation may be required
  • Reconstruction timelines extend
  • Costs increase
  • Indoor air quality concerns arise

In some cases, insurance coverage can become more complicated if mold develops due to delayed mitigation. That’s why early inspection and proper documentation are critical after any fire event — even if the burn damage appears limited.


Fire, water, smoke, and mold often become part of the same claim. Addressing one without evaluating the others can leave hidden problems behind. If your property has experienced a fire, proper inspection and moisture evaluation are essential before reconstruction begins.

Fire damage isn’t just about what burned — it’s also about what got wet.

When Mold Is Discovered During Water Damage Mitigation

Water damage jobs don’t always end with drying equipment and reconstruction. Sometimes, they uncover something that was already there. We recently responded to a basement flood where a supply line had broken and water spread into a finished area. The homeowner acted quickly and called for emergency mitigation and our team arrived shortly after and extraction began. What we found after removing baseboards and opening wall cavities changed the scope of the job entirely. There was mold growth present that clearly predated the current water loss.

And that’s something most homeowners don’t expect.


There’s a common misconception that mold appears instantly after water damage. While microbial growth can begin developing within 24–48 hours under the right conditions, visible and established growth throughout wall cavities does not form in just a few hours.

In this case, we arrived quickly — well within the window where new mold would have developed. The condition we observed indicated previous moisture exposure. That distinction matters.


When mitigation begins, affected materials must be removed to properly dry the structure. This often includes:

  • Baseboards
  • Sections of drywall
  • Flooring materials
  • Insulation

Once materials are opened, hidden conditions are revealed. It is not uncommon for older, previously undetected mold growth to be discovered during this process — especially in basements where prior leaks, humidity issues, or undocumented water events may have occurred.


When mold is discovered during a water damage job, there are typically three possibilities:

  1. It developed from a previous water event that was never properly dried.
  2. It formed from long-term humidity or moisture intrusion.
  3. It is related to the current loss — but only if sufficient time has passed.

Proper documentation and a thorough inspection are critical when mold is discovered during a water damage project. Evaluating the condition of materials, the extent of growth, and the overall moisture environment helps ensure the issue is addressed correctly and completely. At that point, the job is no longer just about drying the structure — it also involves properly removing mold that may have been overlooked during a previous water event or identifying an unforeseen moisture source that could still be active.


Water damage mitigation is not just about removing water and setting equipment. It requires:

  • Careful inspection
  • Controlled demolition
  • Moisture mapping
  • Documentation
  • Understanding building science

When mold is uncovered, the scope of work changes. Remediation protocols must be implemented to prevent cross-contamination and to address affected materials correctly. Ignoring hidden mold does not make it go away. Covering it up creates bigger problems later.


Sometimes a water damage call reveals more than just wet materials. It can uncover previous moisture issues, incomplete repairs, or conditions that were never properly addressed. That’s why a thorough approach matters.

If you experience a water event, it’s not just about drying what you can see. It’s about understanding what may already be behind the walls.

Emergency Water Damage in Villanova Leads to a Seller’s Disclosure Issue

Nine months after purchasing her first home in Villanova, a single mother found herself dealing with a basement flood. She had recently gone through a divorce, had no family living nearby, and was navigating homeownership entirely on her own. A supply line connected to her water softener broke and flooded nearly half of the basement.

She discovered the water quickly, but not before it spread into a finished room, damaging baseboards, drywall, flooring, and personal contents. A neighbor, whose home we had previously helped, referred her to our team, and we were on site within two hours. We documented damaged contents, began water extraction, and began to prep for the necessary demo. At first glance, it appeared to be a straightforward emergency water damage mitigation job.

It wasn’t.


As part of proper mitigation protocol, we removed baseboards to inspect for hidden moisture behind the walls. That’s when we found mold growth throughout multiple areas of the basement. Because we had arrived within two hours of the loss, we knew something immediately: mold does not grow that fast. Even under ideal conditions, it takes time. This wasn’t from the current flood. It was already there.


After remediation was completed, she spoke with neighbors and learned that the previous owners had experienced two prior basement floods. One was caused by a frozen pipe. The other involved the same water softener system. Neither incident had been disclosed during the sale.

The mold we uncovered was consistent with prior water events that had either been improperly dried or never professionally remediated. The issue ultimately led her to pursue action related to non-disclosure, and the matter was later resolved before going to court. For someone already rebuilding her life and managing everything independently, discovering hidden damage in her first home was not just a structural issue — it was personal and financial stress layered on top of an already major life transition.


This single case touches on three important issues homeowners should understand.

1. Emergency Water Damage Requires Immediate Response

Arriving within hours makes a difference. Quick extraction and drying limit structural damage and reduce the likelihood of new mold growth. Speed matters.

2. Mold Often Reveals a Bigger History

When mold is found during mitigation, it does not automatically mean it grew from the current event. Sometimes it exposes a previous water loss that was never properly addressed. Removing baseboards, inspecting wall cavities, and documenting conditions thoroughly protects homeowners — especially when prior damage may not have been disclosed.

3. Seller Disclosure Is Not Optional

Prior flooding and water damage history must be disclosed during a real estate transaction. Undisclosed issues can lead to expensive repairs and legal disputes. Many times, mold discovered during a new water event is actually evidence of an older problem that was hidden.


What began as a routine emergency water damage call in Villanova uncovered long-standing mold and a prior history of flooding that had not been shared. Water damage doesn’t just affect materials. Sometimes it uncovers the past.

If your basement floods, the goal isn’t just to dry what you see — it’s to investigate what may already be there.

How Hot Water Tanks Fail – A Conshohocken Basement Example

We were recently called to a home in Conshohocken, Pennsylvania, just off Fayette Street near the restaurants and bars that make up the downtown strip. The homeowners had invested in finishing their basement, adding a new bedroom and bathroom to create a living space for their in laws who were moving in. Then their hot water tank burst.

By the time we arrived, there was approximately six inches of water throughout the finished portion of the basement. Drywall had wicked up moisture from the floor. Laminate flooring was buckling and separating. Furniture that had been sitting directly on the floor was saturated and unsalvageable. What had been a comfortable, finished living space was now standing water. The surprising part? The water heater was only six years old.


Six years earlier, the original 50-gallon tank had been replaced with a 40-gallon unit. Around that same time, the homeowners added a bedroom and bathroom to make an ensuite for their family moving in. The number of occupants increased, and so did the hot water demand. But the tank capacity went down.

According to the plumber, the failure was likely due to overuse. An undersized tank cycles more frequently and works harder to keep up with demand. That constant strain accelerates wear inside the tank. It’s something most homeowners never consider when replacing a water heater. They focus on price or assume a smaller unit is sufficient without factoring in lifestyle changes. In this case, the mismatch between demand and capacity likely shortened the tank’s lifespan dramatically. After mitigation and repairs were complete, the homeowners installed a properly sized 75-gallon unit.


Finished basements are especially vulnerable because the damage often extends beyond what you see. In this Conshohocken home, we had to remove saturated drywall, baseboards, and trim. The laminate flooring was beyond saving. Portions of the newly built bedroom and bathroom had to be opened up for proper drying. For mitigation purposes, the finished section had to be taken back to a partial unfinished state.

Drying equipment was installed, moisture levels were monitored, and the goal was to prevent secondary issues like mold growth behind walls and under flooring. Water in a finished basement doesn’t stay contained. It travels under materials and into cavities. And when hot water tanks burst, the water keeps running until someone shuts off the supply. In this case, the tank burst and ran for hours as the owners were all out at a family function, allowing hundreds of gallons of water, if not more, to spread throughout the basement before cutting off the supply.


While undersizing and overuse were the primary factors in this situation, there are several other common causes of water heater failure:

Internal Corrosion gradually weakens the steel tank from the inside out.
Sediment Buildup collects at the bottom of the tank and traps heat, increasing stress on the metal.
Temperature Settings that are too high increase pressure and strain components.
Improper Venting can create overheating and safety issues.
Old Age remains one of the most common causes, with most tank systems lasting between eight and twelve years.


When replacing a water heater, capacity matters. If you’ve added bathrooms, finished a basement, or increased the number of people living in your home, your hot water demand has changed. The size of the tank should reflect that. Saving a few dollars on a smaller unit can end up costing far more in water damage repairs.

If you live in Conshohocken or surrounding Montgomery County communities and have a finished basement, it’s worth asking whether your current tank is properly sized for your household. Because when a water heater fails, it doesn’t care how new it is. It only takes one weak point and a few minutes for water to change everything. For emergency water damage restoration in Conshohocken, or water damage restoration in Montgomery County, call us at MSI.

When Speed Isn’t Enough: A Springfield, PA Water Damage Case

Water damage emergencies move fast, and homeowners are often forced to make quick decisions. That’s exactly what happened during a recent water damage job in Springfield, Delaware County, PA. The homeowner called several companies after a refrigerator water line behind the wall failed, flooding the kitchen, dining room, and living room. Because another company was “working around the corner” and promised to arrive within minutes, she chose them based on speed.

Unfortunately, speed alone didn’t solve the problem.


This Springfield home was built on a concrete slab, meaning there was no basement for water to drain into. Instead, water spread:

  • beneath flooring
  • under cabinets
  • into wall cavities
  • through insulation that never fully dried

In slab homes, water doesn’t always stay where you can see it. Moisture can migrate underneath finished surfaces and remain trapped long after the visible water appears gone.


The initial company placed drying equipment and removed only portions of the flooring. After several days, they removed their equipment and told the homeowner they would return to complete the work. They never did.

Once it became clear that reconstruction work would not be part of the project, communication stopped altogether. The water had now been sitting for days, and conditions were ideal for mold growth to begin. At that point, the homeowner terminated their services and contacted us.


By the time our team inspected the home:

  • Moisture was still trapped under flooring
  • Insulation inside walls remained saturated
  • Cabinets and wall materials were compromised
  • Mold had begun forming due to delayed and incomplete drying

Drying the surface alone had done very little to address the actual moisture problem.


To correctly resolve the damage, we had to:

  • Remove affected flooring, cabinets, and wall sections
  • Address moisture beneath the slab-adjacent areas
  • Disinfect impacted spaces
  • Dry structural materials thoroughly, including insulation
  • Ensure conditions were no longer suitable for mold growth

This wasn’t about reconstruction, it was about doing the restoration correctly, even though it required more invasive work due to the delay.


Fast response matters, but follow-through matters more.

Water damage restoration isn’t just about placing equipment and leaving. It requires:

  • identifying where water actually traveled
  • understanding the structure of the home
  • monitoring drying conditions
  • making decisions based on moisture data, not convenience

In many cases, especially in slab homes, partial drying leads to bigger problems later, including mold and material failure.


This Springfield case is a reminder that homeowners need a water damage restoration company focused on their needs first, not on downstream reconstruction work or convenience-based decisions. When water damage isn’t addressed fully, the cost, and disruption, only increases over time. If you’re dealing with emergency water damage, especially after a hidden leak or appliance failure, it’s critical to choose a company that’s prepared to finish the job correctly, not just start it quickly. And even though it may seem easier said than done, making the right decision on who to use, can make all the difference in between handling a job right, or having even more stress down the road.

Why Toilets Overflow and What to Do When It Turns Into a Sewer Emergency

Few calls are more stressful than the one we received from a homeowner in West Chester, PA, near West Chester University — home of the Rams. She was panicked because water was pouring out of her toilet, flooding the bathroom, soaking the hallway, and then breaking through the ceiling into the first-floor dining room below.

By the time our team arrived, contaminated water had affected multiple levels of the home, including hardwood flooring, ceilings and even into the unfinished basement. This wasn’t a simple plumbing issue, it was a sewer backup that required professional handling from start to finish. Situations like this happen more often than homeowners realize, especially in older neighborhoods, and understanding why toilets overflow, and what to do next, can make a major difference in limiting damage and health risks.


Toilets don’t overflow randomly. In nearly every case, there’s a blockage or failure somewhere in the system.

Common causes of toilet overflows include:

  • Clogged sewer lines (main line or branch line backups)
  • Flushing items that don’t break down properly
  • Tree root intrusion into underground sewer pipes
  • Older plumbing systems with reduced pipe diameter
  • Partial blockages that worsen over time

In this West Chester home, the toilet overflowed because the sewer line was clogged, causing wastewater to back up through the lowest exit point — the toilet.


When a toilet overflows due to a sewer issue, the water involved is classified as Category 3 water — the most hazardous type of water damage.

Sewage-contaminated water can contain:

  • Bacteria and viruses
  • Pathogens harmful to humans and pets
  • Contaminants that soak into porous materials

This is why homeowners should never attempt to clean sewer water themselves. Even brief contact can pose serious health risks, and improper cleanup can allow contamination to remain hidden inside walls, flooring, and ceilings.


If sewage is coming out of a toilet, time matters, but safety comes first.

The right steps to take:

  1. Stop using all plumbing fixtures immediately
    Running water can worsen the backup.
  2. Contact a licensed plumber to identify and clear the blockage.
  3. Avoid contact with the water — do not attempt cleanup.
  4. Call a professional water damage company experienced with sewer backups and emergency water damage.

In this case, once the homeowner’s plumber cleared the sewer line, our team stepped in to handle the damage safely and correctly.


Sewer damage cleanup is far more than water removal.

At this West Chester home, our work included:

  • Water extraction from affected rooms and ceilings
  • Removal of contaminated materials, including portions of ceiling, walls and flooring
  • Disinfection and sanitation of all affected areas
  • Structural drying to ensure moisture didn’t remain trapped
  • Steps taken to prevent future mold growth
  • Assistance with insurance claim documentation

Without proper removal, disinfection, and drying, sewer damage can lead to long-term health issues and structural problems.


Many homeowners are surprised when a toilet overflow damages areas far from the bathroom.

When sewage backs up:

  • Water can travel through floor systems
  • Ceiling and wall cavities can trap moisture
  • Damage may not be visible right away

In this situation, wastewater from the second floor traveled down into the first floor and basement areas, damaging ceilings and hardwood floors along the way.


Toilet overflows caused by sewer backups are serious events that require immediate, professional attention. What starts as a plumbing problem quickly becomes a health and safety issue, especially when contaminated water spreads through multiple levels of a home.

If you experience a sewer-related toilet overflow, it’s important to act quickly, protect yourself, and bring in qualified professionals who understand both the cleanup and the long-term risks. Emergency water damage involving sewage should always be handled properly the first time to avoid bigger problems later. And at MSI we’ve been handling emergency water damage restoration jobs in Philadelphia, Delaware County, Montgomery County, Bucks County, Camden County New Jersey and Delaware since 1998, so you can trust our team will get it done right the first time.

Frozen Pipes and Hidden Water Damage

When winter temperatures drop, most homeowners worry about frozen pipes bursting and flooding their homes. But in reality, some of the most serious water damage from frozen pipes doesn’t show up right away — and often doesn’t look like a typical “burst pipe” situation at all.

In many homes across Philadelphia, Delaware County and throughout New Jersey, frozen pipes crack or split inside walls, ceilings, or floor systems. Instead of flooding a room, they leak slowly, allowing water to soak into building materials where it can remain hidden for days or even weeks.

Frozen pipe damage doesn’t always come with an obvious emergency. In many cases:

  • Pipes freeze and partially crack rather than fully burst
  • Leaks occur inside walls or ceilings
  • Water spreads into insulation, framing, and drywall
  • The pipe may stop leaking once temperatures rise

By the time homeowners notice stains, odors, or peeling paint, significant water damage has already occurred.

We frequently see damage from frozen pipes in:

  • Exterior walls
  • Basement ceilings
  • Crawl spaces
  • Attics and knee walls
  • Behind cabinets and vanities

These areas are harder to access and often go unchecked after a cold snap.

Watch for:

  • Discoloration on ceilings or walls
  • Soft or bubbling drywall
  • Musty or damp odors
  • Warped trim or flooring
  • Mold growth appearing weeks later

If your home experienced prolonged freezing temperatures, these signs may point to water damage caused by frozen pipes, even if no major leak was ever seen.

When moisture remains trapped inside walls or ceilings, it creates ideal conditions for mold growth. This is why mold problems often appear weeks or months after winter weather, long after homeowners believe the risk has passed. What started as a small freeze-related leak can turn into a much larger remediation issue if the moisture isn’t properly identified and dried.

If your home went through a hard freeze:

  • Don’t assume no flooding means no damage
  • Pay attention to new stains or odors
  • Avoid ignoring minor changes in walls or ceilings
  • Consider a professional inspection if something seems off

Proper moisture detection can reveal hidden water damage before it turns into a bigger problem.

Frozen pipes don’t always announce themselves with flooding or obvious leaks. In many cases, the damage happens quietly and out of sight — until repairs become far more costly. If your home experienced freezing temperatures and something doesn’t feel right, it’s worth taking a closer look before hidden water damage spreads further.